GameplayDebugger 简述
UE4 中有很多种把调试信息显示在屏幕上的办法
比如 AHUD::OnShowDebugInfo 注册一个函数来打印
比如 GEngine->AddOnScreenDebugMessage
每种方式都有自己的适用场景
GEngine->AddOnScreenDebugMessage 适用于一次性的打印
AHUD::OnShowDebugInfo 适合于收集实时状态并显示在屏幕上
而我们今天要说的 GameplayDebugger 则可以看做一个加强版的 OnShowDebugInfo
它的定位也是实时收集状态并显示在屏幕上,但是他的原理更加复杂,提供的功能更多,适用场景也不完全相同
相对于 OnShowDebugInfo,GameplayDebugger 解决的问题主要是收集显示服务器上的状态并打印在当前客户端上
所以我们可以看到官方提供的几个调试类型,包括 NavMesh,EQS,AI,BehaviorTree,Ability 这些
都是在服务器上运行主要或者全部逻辑,不靠同步就无法在客户端上查看平时非展示的信息
依靠 Dedicated Server 的游戏,在调试版本开启 GameplayDebugger 宏,也可以轻松的在客户端屏幕上展示需要查看的服务器信息
而不是只能事后查看日志
如果是单机游戏,使用 AHUD::OnShowDebugInfo 也就够了,当然 GameplayDebugger 的代码结构性更强一点,一般只需要继承实现一些接口就可以了
另外呢,GameplayDebugger 设计上也是最小化 Debugger 所用的网络带宽,提倡自定义序列化 Debugger 数据,并且还支持自定义调试者按键操作的功能
这些支持在 OnShowDebugInfo 都是没有的
GameplayDebugger 的基本使用
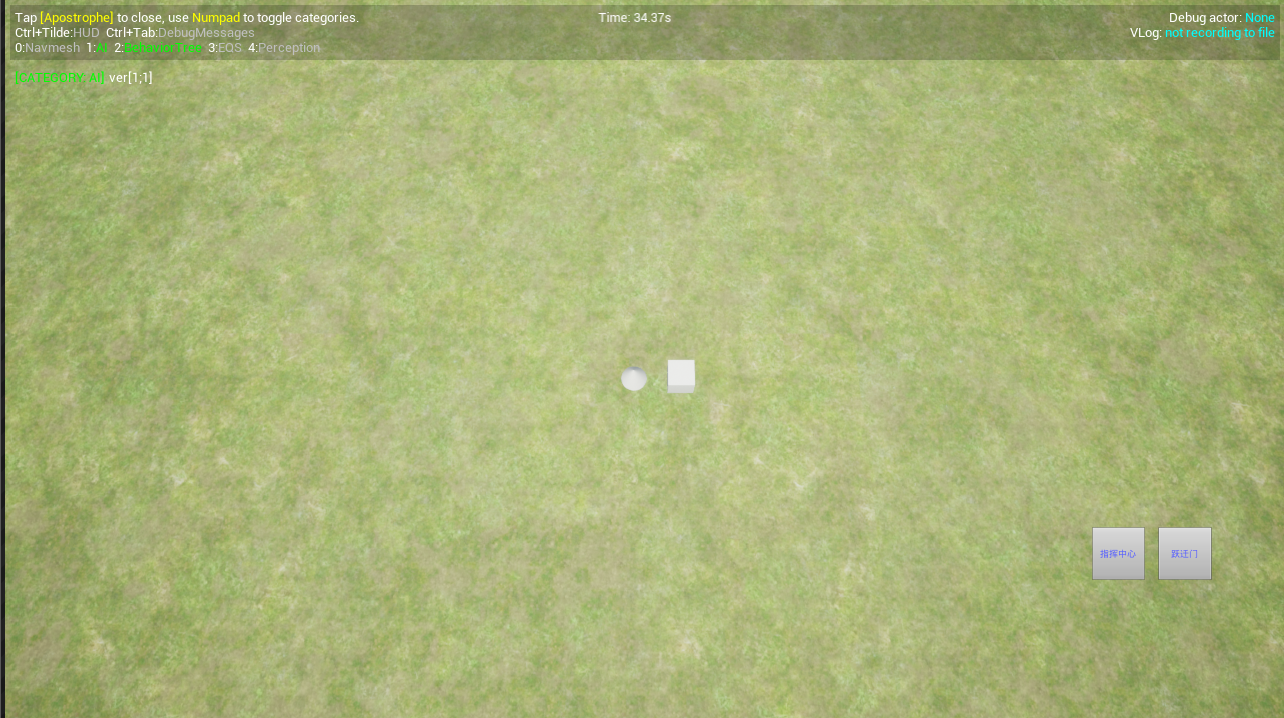
在游戏中,按下 ‘ 键,或者在控制台中输入 EnableGDT ,就会呼出 GameplayDebugger 控制台

图片中上面的部分为 GameplayDebugger 状态栏
0 到 n 是当前支持的 Debug Category,使用数字小键盘按下相应的数字开启或关闭,开启的是绿色,关闭的显示为白色
右上角显示的是当前 Debug 的 Actor 和是否记录 VLog
各个开启的 Category 的 Debug Info 会显示状态栏的下面部分,而 Debug 信息的绘制是完全自定义的
GameplayDebugger 的基本原理
Debugger 会针对每个 Category 配置好的周期,针对在编辑器中选择的 Actor 来进行按一定规则的数据收集
并把收集到的数据通过针对每个玩家独立的一个 Replicator 同步到测试者的客户端上
然后通过自定义的规则,将数据显示在屏幕上
GameplayDebugger 的基本扩展
实现自定义的 Category
创建同步用结构体
自定义一个同步用的 Struct ,用于描述需要同步的 Debug 信息
这个 Struct 通常为了不过度占用游戏本身网络资源引起 Debugger 的副作用,会自定义序列化函数 void Serialize(FArchive& Ar),尽量减少网络占用
创建自定义 Category
继承 FGameplayDebuggerCategory 类型,编写自定义的 Category 类,实现其中的几个接口
- 收集数据
1
virtual void CollectData(APlayerController* OwnerPC, AActor* DebugActor)
在服务器上面收集需要 Debug 的信息,收集完成后会根据同步数据包是否 Dirty 的情况进行同步,OnwerPC 是操作者的 PlayerContoller,DebugActor 是当前选中需要收集信息的 DebugActor
这个里面通常有设置同步用 Struct 内容的操作
收集的内容其实也不限于 DebugActor ,能够通过 DebuggerActor 收集到的数据,都可以作为信息被收集
更是可以突破 DebugActor 的限制,从其他的地方提前收集参数并缓存起来,再在 CollectData 的时候设置给同步用的 Struct - 绘制Debug信息
1
virtual void DrawData(APlayerController* OwnerPC, FGameplayDebuggerCanvasContext& CanvasContext);
本地绘制需要显示在屏幕上的 Debug 信息
- 高级绘制
1
virtual FDebugRenderSceneProxy* CreateDebugSceneProxy(const UPrimitiveComponent* InComponent, FDebugDrawDelegateHelper*& OutDelegateHelper);
如果需要一些高级的Debug信息绘制方式,可以覆盖这个函数
详情可以了解 FDebugRenderSceneProxy 以及其父类 FPrimitiveSceneProxy 的工作方式
可以实现一些高级效果,比如在 Actor 周围绘制线条,或者图形,文本等 - 客户端接收同步回调
1
virtual void OnDataPackReplicated(int32 DataPackId);
Debug 信息同步完成的回调函数
为了不让 Debugger 影响游戏主体的网络过多,应当适当的设置 FGameplayDebuggerCategory 的参数
float CollectDataInterval;
或者说设置非收集,然后用
void ForceImmediateCollect()
在合适的时机来强制收集(通常这样会在游戏本身的部分嵌入一些代码,会加大耦合,GameplayDebugger 本意上通过重写收集函数是尽量去耦合的,可以考虑用事件等方式把游戏本身和 Debugger 的代码解耦)
配置同步用 Struct 地址
1 | template<typename T> |
这个函数会配置一个同步数据的 DataPack (FGameplayDebuggerDataPack 类型),传入的 T* 就是你自己的需要同步的 Struct Data 的地址
函数内部会绑一下序列化函数和数据包清空等操作
一个 DataPack 是复用的,内部包含数据的版本信息,传输状态等,也就是说,例如,我们通常通过一个 Struct 的地址来存放数据
DataPack 会在 Collect Data 后判断里面的内容是否变化等,来触发同步和客户端的接收
我们一般在 自定义的 Category 类中加一个同步用的 Struct 的成员
然后在构造函数中调用 SetDataPackReplication 传入这个成员的地址,来配置一个同步包
其他
其他的一些 FGameplayDebuggerCategory 的成员可在有需要的时候查看代码
启用 Category
1 |
|
通过上述代码来注册一个 Category 到 GameplayDebugger 系统中
其中 FCustomDebuggerCategory::MakeInstance 函数指针返回一个 TSharedRef
通常这段代码写在游戏模块的
StartupModule()
中,并在
ShutdownModule()
的时候通过
1 |
|
来卸载
关于 Replication Graph
Replication Graph 启动的时候,需要手动设置 AGameplayDebuggerCategoryReplicator 类型的同步行为
建议把官方 Shooter Game 中的代码复制过来
但是要注意官方 Shooter Game 中的代码有个bug,引起客户端无法同步 AGameplayDebuggerCategoryReplicator
修改方式在注释中
1 |
|
结个尾
编写自定义的 Category 需要注意的是,Debugger 本身不应该过重的占用游戏本身的资源,包括计算力和网络,也应该做到和游戏本身的功能解耦合
GameplayDebugger 除了 Category 之外,还有自定义测试者输入的功能,后续有空的时候再写